Instruction manual of automatic bottle cap torque tester
I. Overview
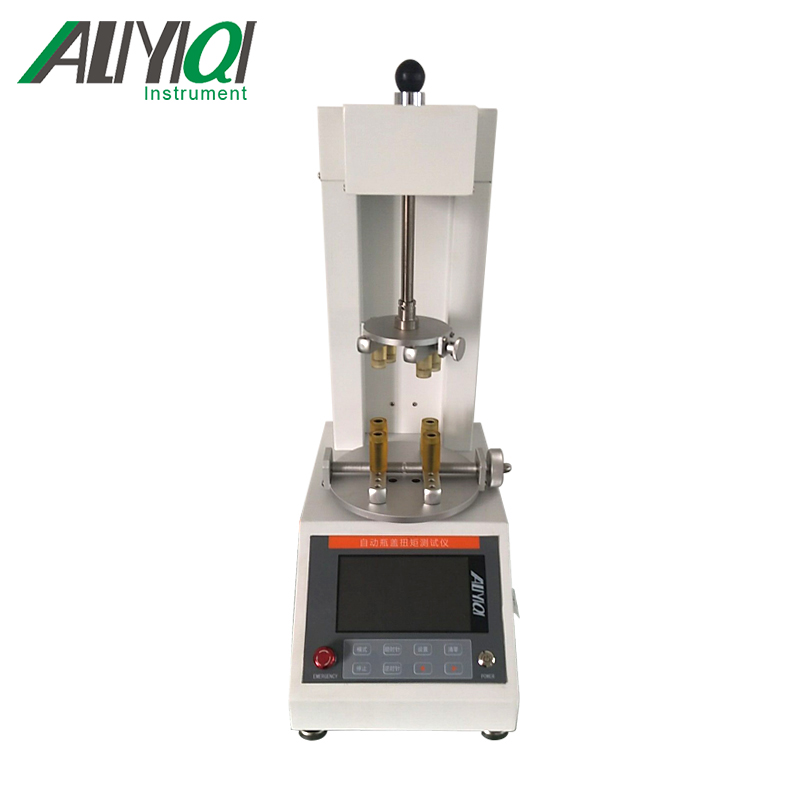
1.Main purpose and scope of application
The automatic cap torque tester ANPM is a new patented product that automatically tests the torque value. It adopts the principle of combining advanced electronic technology and precision mechanical transmission to replace the previous torque value that is manually tested by opening or locking the cap The error meets the technical requirements stipulated in the national standard GB / T 17876. Equipped with high-precision torque sensor to achieve precise loading and positioning. It is suitable for detecting the torque value of locking and opening of various bottle, nozzle, hose and other packaging products, such as: medicinal glass bottles, medicinal plastic bottles, child safety caps, beverage bottles, mineral water bottles , Milk bottles, oil barrels, etc. It is the first choice for beverage and bottle production manufacturers and research institutions, quality inspection institutions, large and medium-sized enterprises to test product quality.
2. Test principle
Fix the bottle body and bottle cap of the measured object on the fixture equipped with the tester, and clamp them. The bottom clamp is connected to the torque sensor in the tester box. After starting the instrument, the upper clamp clamps the bottle cap and starts to rotate, driving the bottle body, which is then transmitted to the torque sensor to test the torque value required for the cap to rotate clockwise or counterclockwise.
2. Specifications
|
model |
ANPM-1 |
ANPM-2 |
ANPM-3 |
ANPM-5 |
ANPM-10 |
|
|
Torque range (N.m) |
1N |
2N |
3N |
5N |
10N |
|
|
Maximum test range / minimum division value |
N · m |
1.000 / 0.001 |
2.000 / 0.001 |
3.000 / 0.001 |
5.000 / 0.001 |
10.00 / 0.01 |
|
Kgf · cm |
10.20 / 0.01 |
20.40 / 0.01 |
30.60 / 0.01 |
51.00 / 0.01 |
102.0 / 0.1 |
|
|
Lbf · in |
8.85 / 0.01 |
17.70 / 0.01 |
26.55 / 0.01 |
44.25 / 0.01 |
88.5 / 0.1 |
|
|
measurement accuracy |
± 1% |
|||||
|
Angle accuracy |
1 °/100 ° |
|||||
|
Clamping range |
18mm-146mm (small fixture 6mm-60mm) |
|||||
|
Automatic tightening speed |
3-90deg / s (adjustable) |
|||||
|
Operating temperature |
0 ℃ ~ 35 ℃ |
|||||
|
storage temperature |
-20 ℃ ~ 70 ℃ |
|||||
|
humidity |
80% without condensation |
|||||
|
Dimensions |
440 * 255 * 1050mm |
|||||
|
net weight |
About 32kg |
|||||
|
power supply |
AC 220V 50Hz or AC 110V |
|||||
3. Product Features
1. Measure the torque value (tightening force value), angle value, bidirectional measurement clockwise and counterclockwise of the bottle cap.
2. Three torque units: N.m, Kgf.cm, Lbf.in.
3. Precision
Angle accuracy: 1 ° / 100 ° (unit: deg)
Torque accuracy: ± 1%
4. Voltage: input AC220V / AC110V.
5. Comes with RS232 interface, can be connected to the computer to use the host computer control and real-time curve.
6. Four measurement modes: manual mode, automatic peak mode, repeat mode, torque angle modulus.
7. Running speed: 3-90deg / s.
8. Overload protection, the protection value is 120% of full scale.
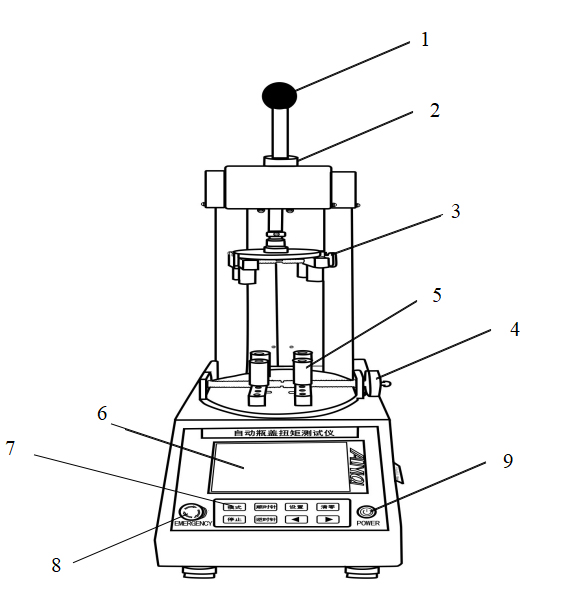
Product overall structure
1.shapestructure
|
1. axis of rotation |
2. Limit sleeve |
3. Measuring disk fixture (small) |
4. Measuring disk fixture (large) |
5. Rubber column |
|
6. LCD display |
7. Button panel |
8. Emergency stop switch |
9. Switch button |
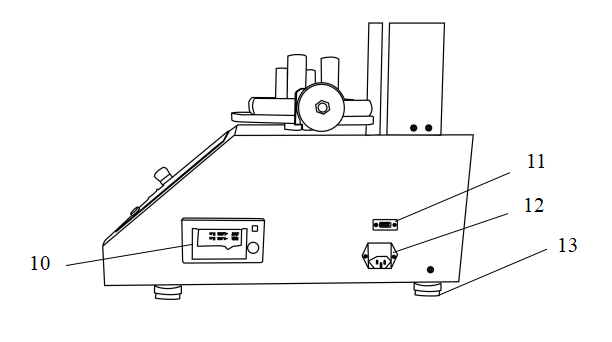
10. Printer |
|
11. Communication interface (RS232) |
12. Power socket |
13. Foot |
2. Function button panel
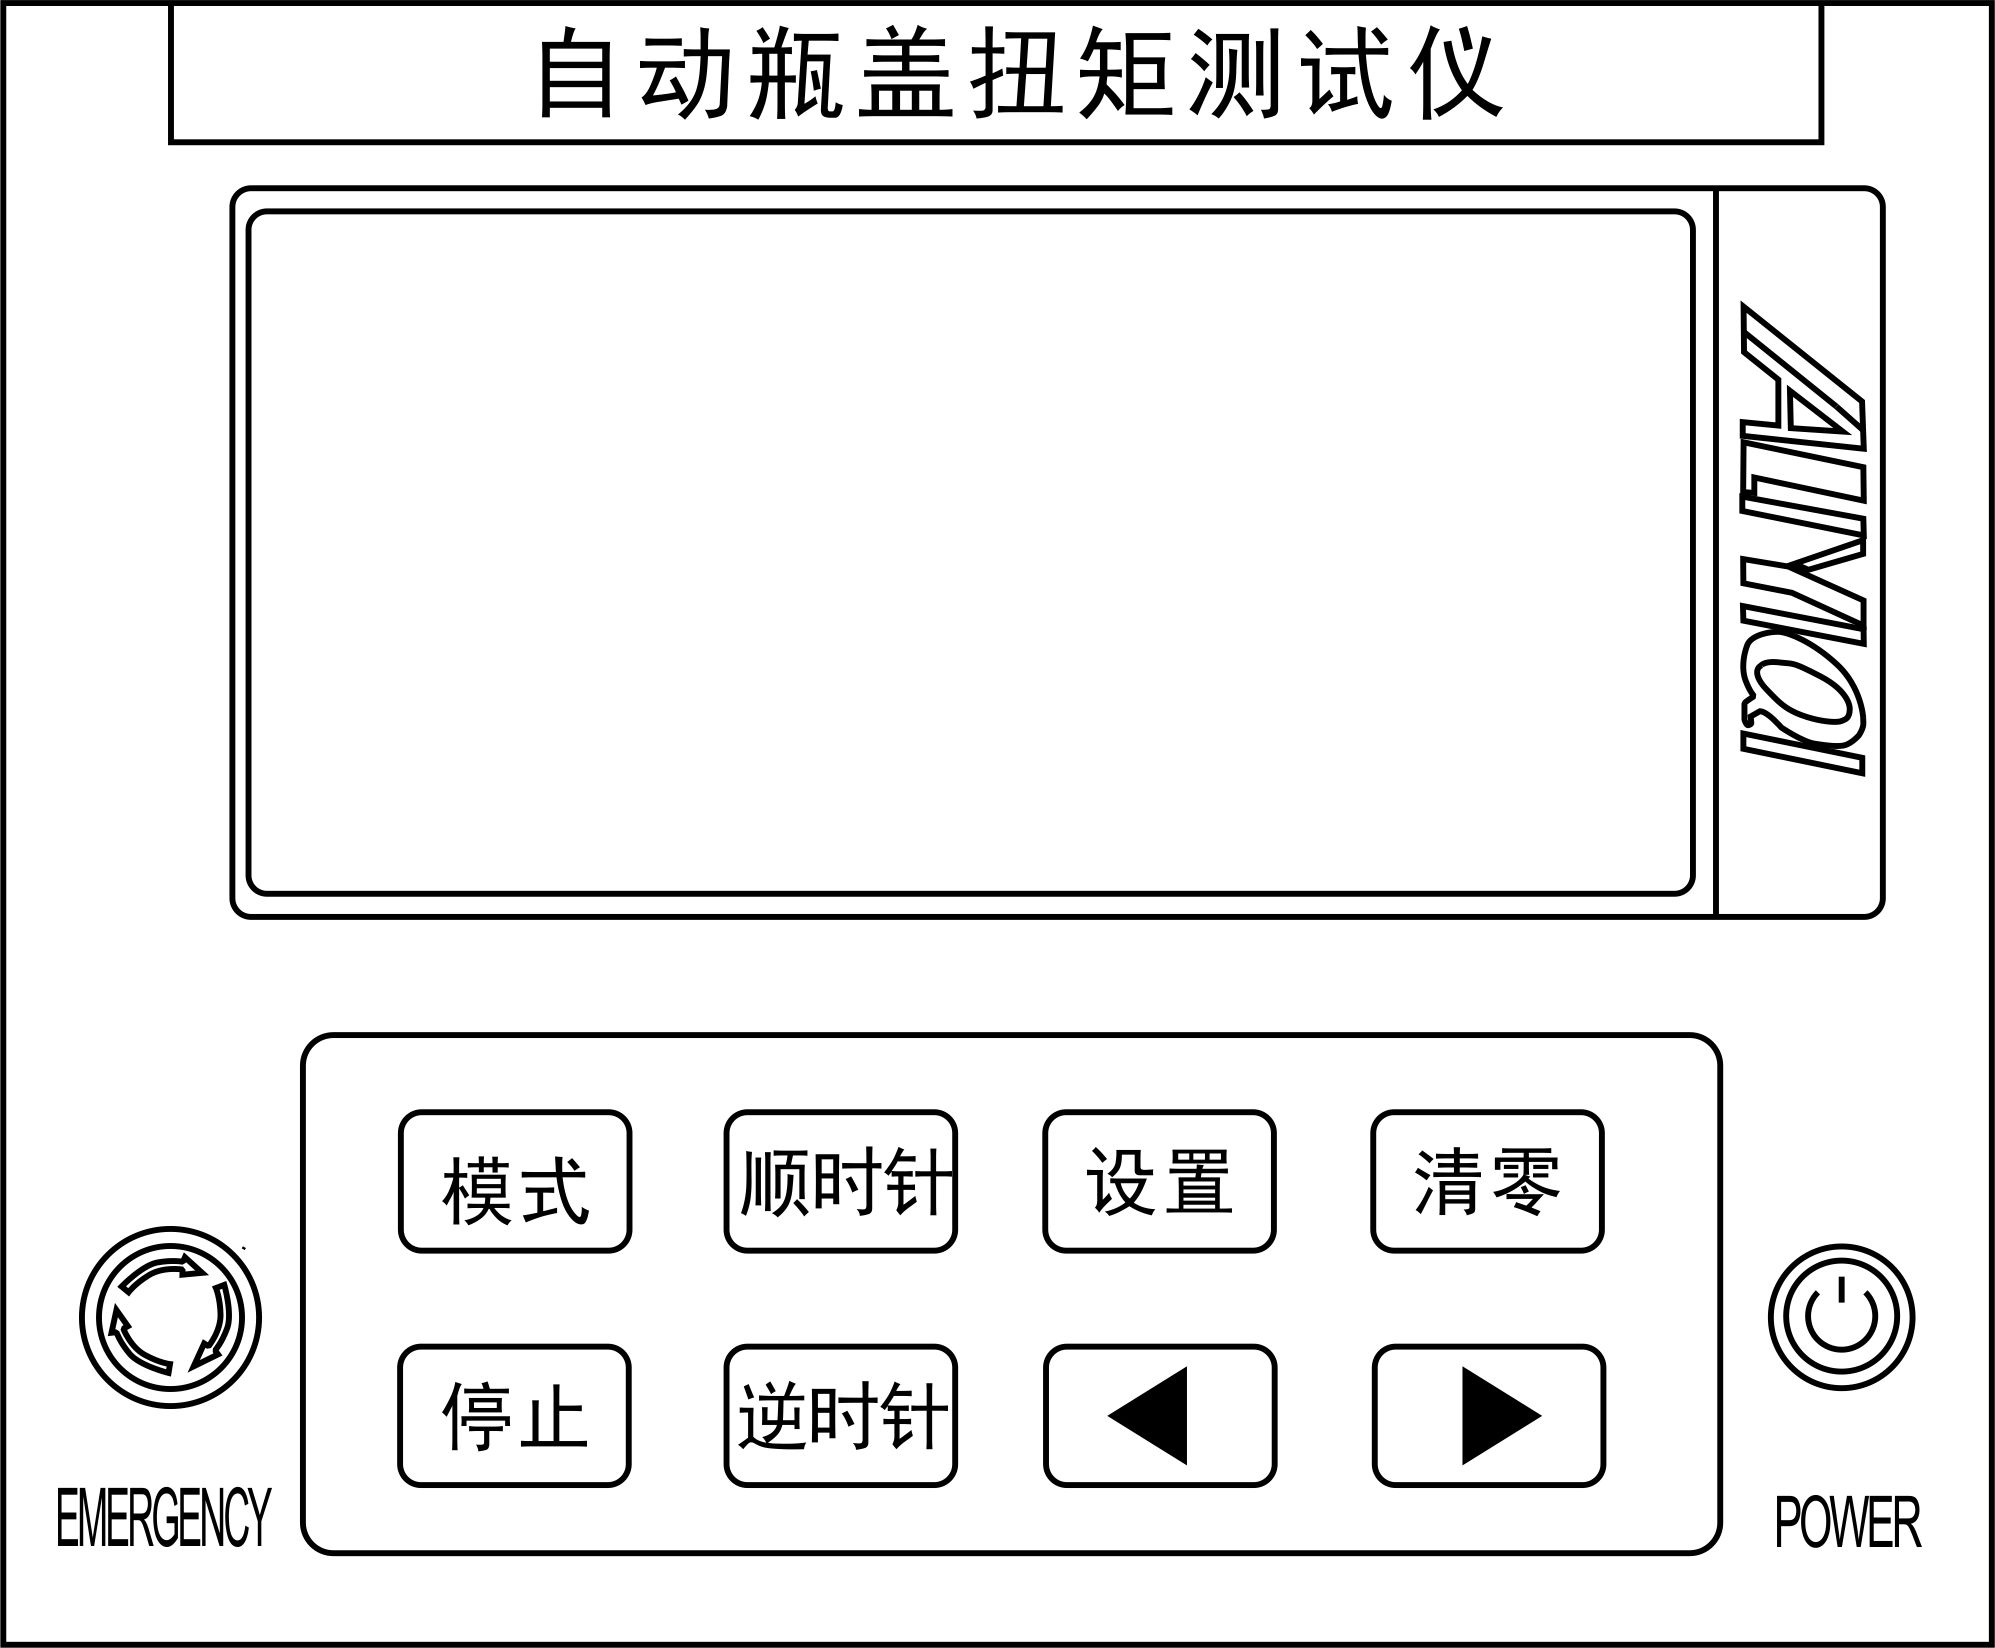
2.1 Mode key:Press this key, the mode is used to switch modes, there are four measurement modes: manual mode, automatic peak mode, repeat mode.
2.2 Clockwise key:Press this key, the rotating shaft rotates clockwise to test. Looking down on the product from the front, you can find that one end of the rotating shaft rotates clockwise from right to left.
2.3Set key:Short press this key to enter the system setting interface.
2.4Clear key:Short press this key to clear the measured force value. Long press this key to clear the angle value. (The force value / angle clearing must be effective when the motor is stopped)
2.5Stop button:Press this key to terminate the test.
2.6 Counterclockwise key:Press this key to rotate the shaft for counterclockwise rotation test. Looking down on the product from the front, you can see that one end of the rotating shaft rotates clockwise from left to right.
2.7左/Right arrow key:Used for rotation speed adjustment, short press left and right to fine adjust, long press left and right to automatically increase and decrease, press stop to stop speed increase and decrease.
2.8 Emergency key:emergency button,When an emergency occurs, you can quickly press this button to achieve protection measures.
2.9 Power key:The switch button is used to turn on / off the power supply after the machine is powered on.
3. Instructions for use and operation
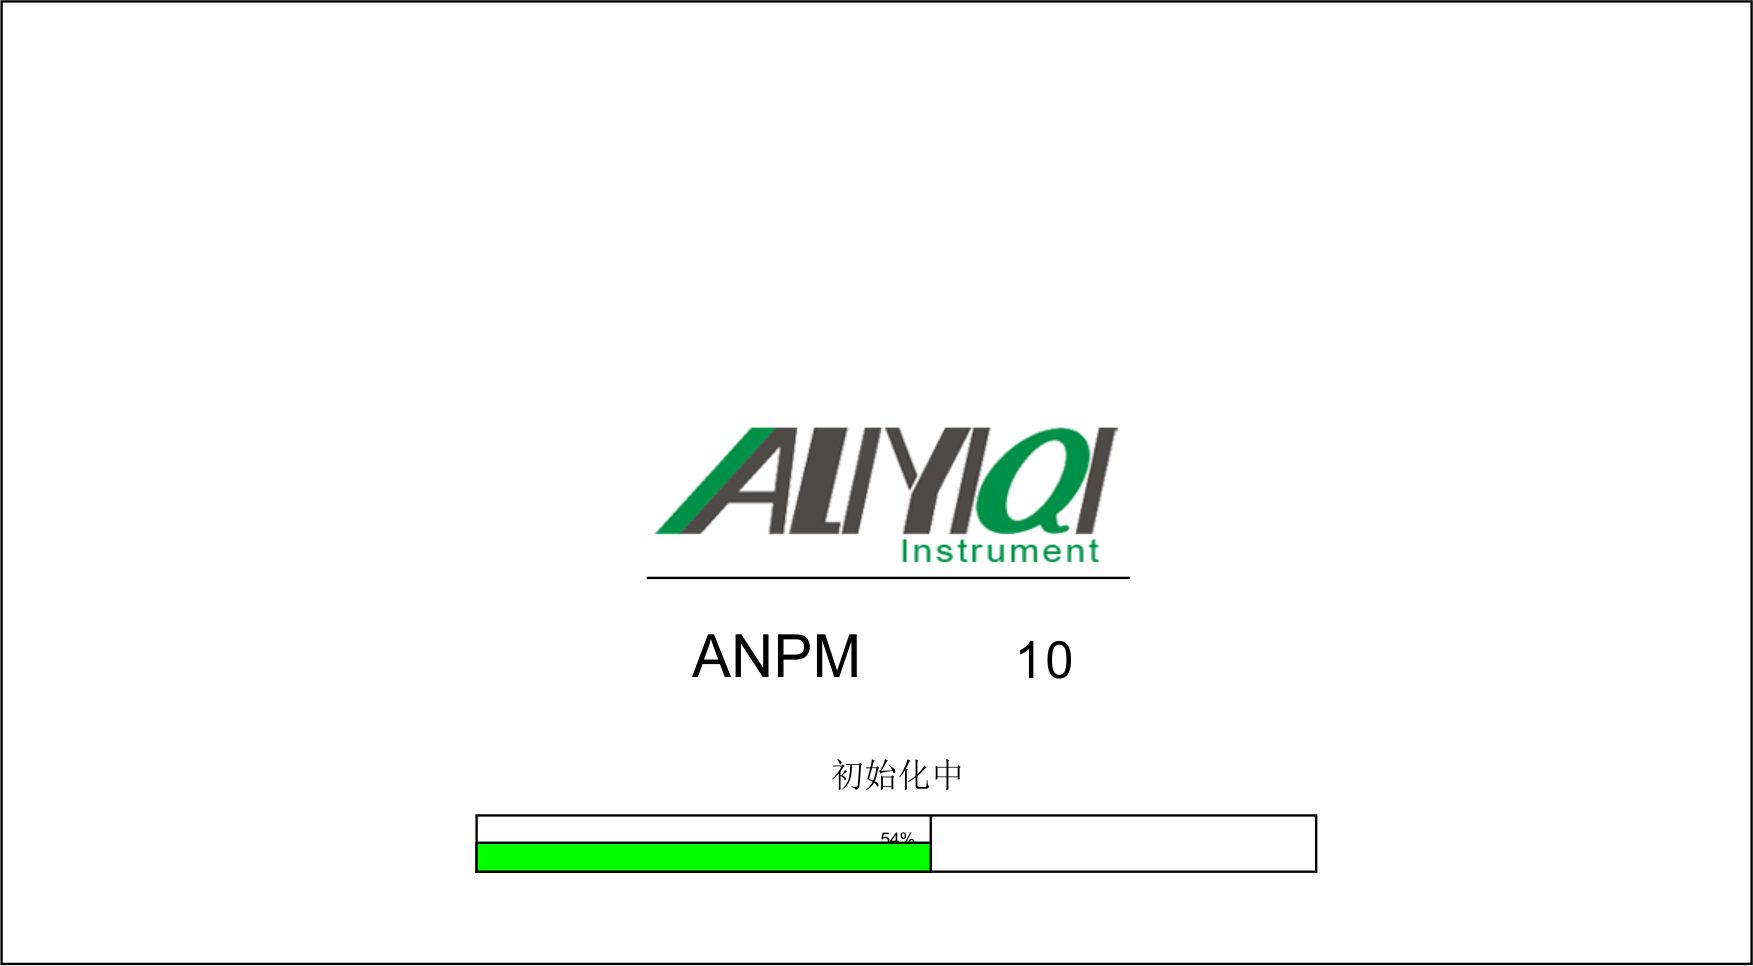
1. Boot screen display
Startup displays brand information and range during initialization (loading progress bar).
Measurement interface display
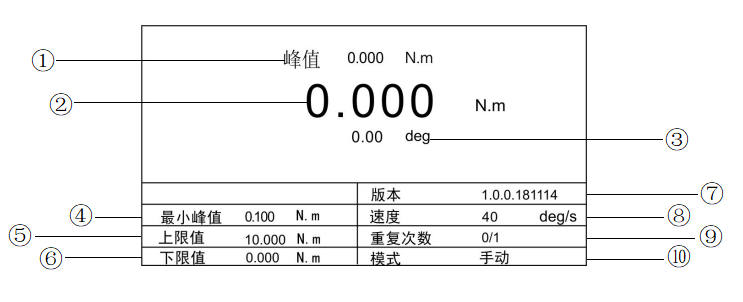
① It indicates the peak torque value produced by the instrument when testing the product.
② Indicates the real-time torque value generated by the instrument when testing the product and the torque unit currently used.
③ It indicates the forward / reverse rotation angle value of the instrument when testing the product.
④ Minimum peak value: The minimum storage value set according to the current peak torque measurement requirements of the measured object, and data smaller than this value will not be displayed by the peak storage.
⑤ Upper limit value: The maximum test value can be set freely according to the needs. When the set upper limit value is reached, the rotating shaft will automatically stop rotating and reverse, and the upper limit value shall not be higher than the full range. (For repeat mode)
⑥ Lower limit value: The user sets the lower limit value, which can be set freely according to the needs. When the set lower limit value is reached, the rotating shaft stops automatically, and the lower limit value should not be higher than the set upper limit value. (Used in repeat mode, the lower limit default reference is 0)
⑦ Version: a serial number identification of the instrument program itself.
⑧ Speed: The response speed of the rotation axis, used for the instrument to perform clockwise / counterclockwise rotation test. (Short press left and right to fine tune, long press left and right to automatically increase and decrease, press the stop speed to stop)
⑨ Number of repetitions: used for repetitive testing when the instrument tests uniform workpieces.
⑩ Mode: It indicates the test status used in the current test.
User setting interface
Press the setting button, the display interface is as follows:
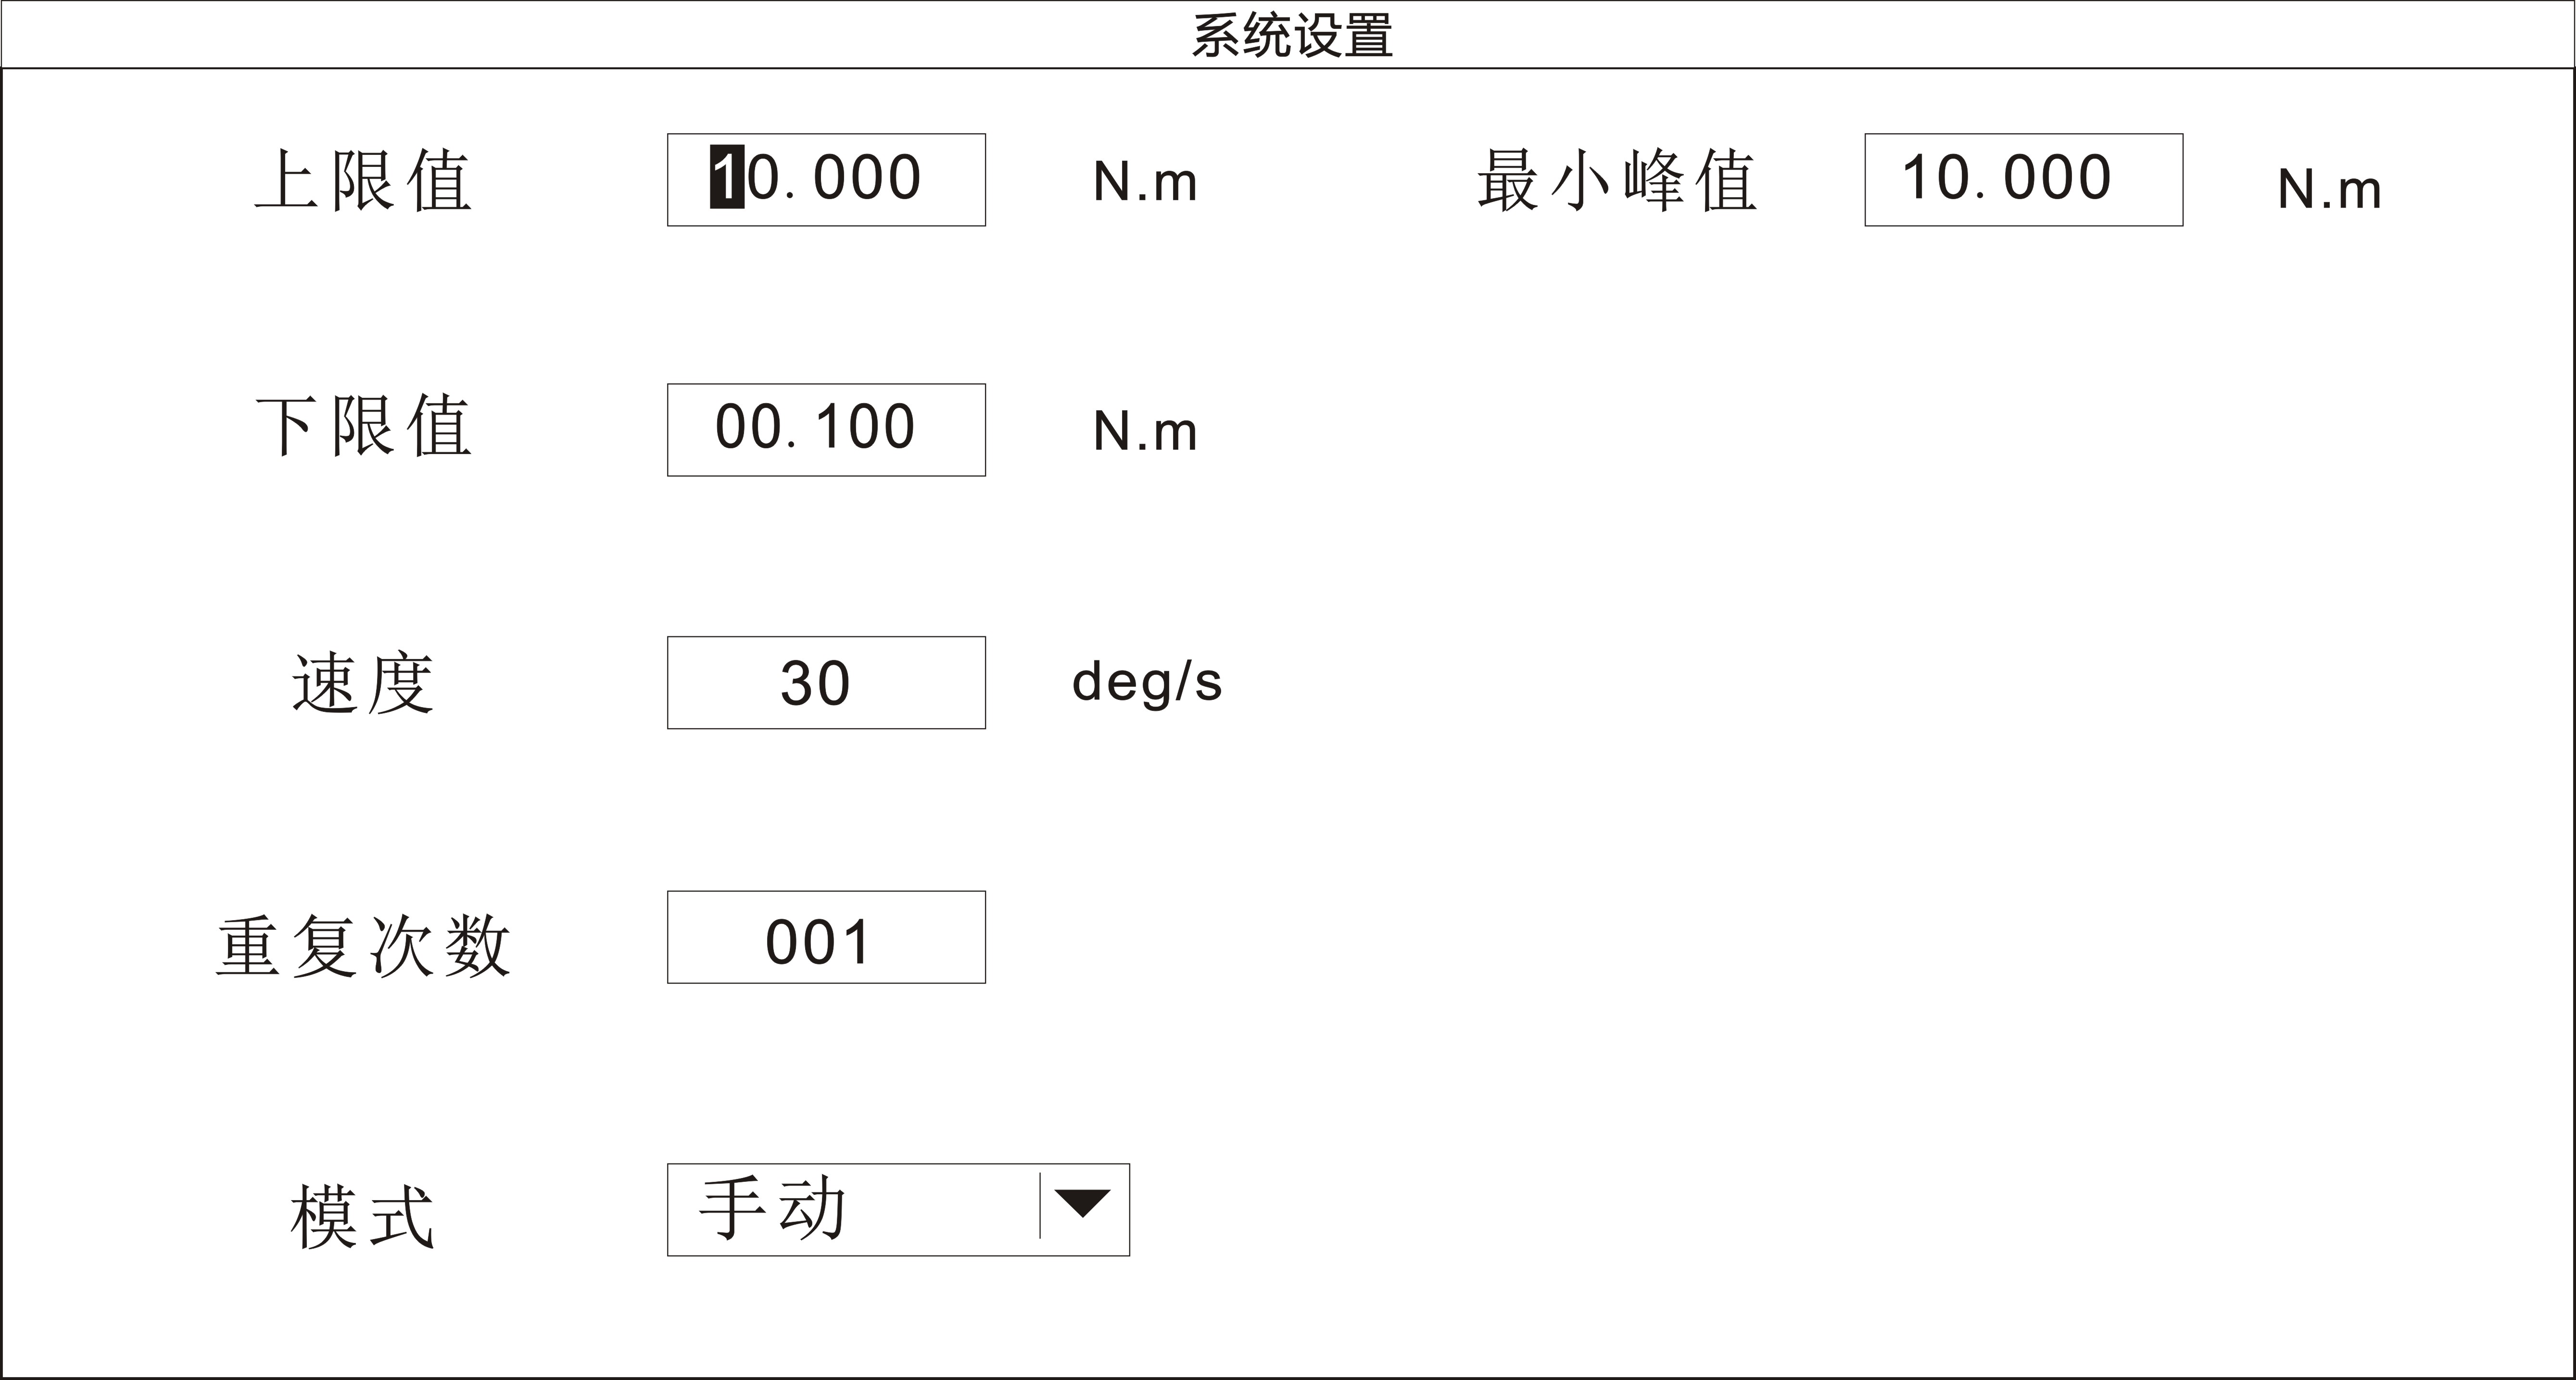
Use \"Stop key \" to move the black cursor up and down to select the setting item Left / right arrow key \"to set the black cursor to move left and right.
Description of setting parameters
(The above limits are set as an example)
Use \"Left / Right Arrow Keys, Clockwise / Counterclockwise Keys \" to move the black cursor to the left and right, and adjust and modify the value. After the adjustment, press the Set key to confirm and save the setting data Save the modified data). The set data cannot exceed the maximum load value.
4.1 Upper limit:According to the maximum test value that can be set freely, when the set upper limit value is reached, the rotating shaft will automatically stop rotating and reverse, and the upper limit value should not be higher than the full range. (For repeat mode)
4.2 Lower limit:The user sets the lower limit value, which can be set freely according to the needs. When the set lower limit value is reached, the rotating shaft stops automatically, and the lower limit value should not be higher than the set upper limit value. (Used in repeat mode, the lower limit default reference is 0)
4.3 Speed: The response speed of the rotation axis is used for the instrument to perform clockwise / counterclockwise rotation test.
4.4 Number of repetitions:It is used for repeated testing. When testing the same work piece, set the upper and lower limit values for the number of repeated tests.
4.5 Mode:Four modes switch, freely set according to test requirements. Manual mode, automatic peak mode, repeat mode, torque angle modulus. (The torque angle mode can only be operated on the computer, and the computer software needs to be connected)
4.5.1. Manual mode: place the measured object on the machine, rotate the fixture manually, the system will record the peak value. (Mode selection manual, press the clockwise or counterclockwise button, the previous peak value will be cleared, press the stop button to stop the current rotation)
4.5.2. Automatic peak mode: This mode is used in conjunction with the setting of the lower limit value. When a peak value is detected and the current value is less than the lower limit value, the instrument stops rotating. (Mode selection auto peak, press the clockwise or counterclockwise button, the previous peak will be cleared)
4.5.3. Repeat mode: This mode is used for repeated testing. You need to set the upper and lower limits and the number of repetitions to use. When the upper and lower limits are set, press clockwise or counterclockwise. After starting, when the force value reaches the upper limit After the limit value, the rotation becomes the reverse direction. When the force value is less than the lower limit value, the count is added in one operation, and the direction is changed at the same time for the next measurement until the total number of measurements is completed.
4.5.4. Torque angle mode: This mode can only be used with computer software. The instrument cannot be used directly. It is mainly used to record the real-time curve of rotation. Two angle values need to be set. Return to the origin after reaching two angle values successively, and record the three-segment curve to display on the computer software.
4.6 Minimum peak value:According to the minimum storage value set according to the current peak torque measurement requirements of the measured object, the data smaller than this value will not be displayed by the peak storage.
5. Description of other methods of use:
5.1 Angle reset:Long press the reset button
5.2 Unit switching: Long press the stop button
5.3 Print current value:Long press to set (Configure the micro printer, the print data is the peak value, real time, angle value tested at the time)
4. Communication
Use RS-232 to communicate with computer software. The software can record the curve of manual, automatic peak, torque angle mode, but the operation must be operated on the software. The setting value of the instrument can be directly modified on the software.
The specific connection method of the instrument and the software is as follows:
Use RS-232 to USB data cable for connection and communication, connect the RS-232 female head to the instrument, and connect the USB male head to the computer.
Turn on the instrument power so that the instrument is in the measurement interface.
Put the supplied CD-ROM into the computer CD-ROM drive and open the application.
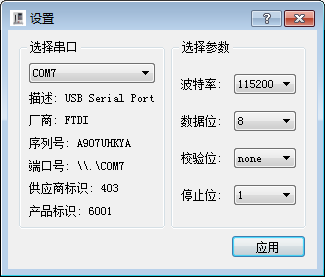
Click the \"Settings \" button at the top left of the software window, and the \"Settings \" dialog box will pop up. Select the serial port corresponding to the computer in the serial port selection. The specific steps are as follows: (First, you need to confirm the corresponding port model of the computer)
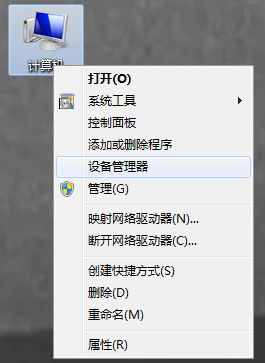
Right-click \"Computer \" and select \"Device Manager \" (as shown in the figure below):
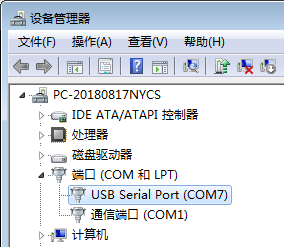
② In the pop-up \"Device Manager \" dialog box, check the serial number of the sub-item of the port item class (as shown in the figure below):
③ Return to the\"Settings\" dialog box popped up by the software, select the corresponding serial number (COM 7) in the serial port selection, and then click Apply, as shown in the following figure:
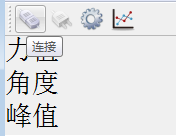
④ After the application is completed, click Connect to use the software, as shown below:
(The icons from left to right are connected, disconnected, settings, charts)
⑤ In the lower left corner, it indicates that the connection is successful, and the test can be used, as shown in the following figure:

5. After the connection is completed, the main interface of the software is shown below:
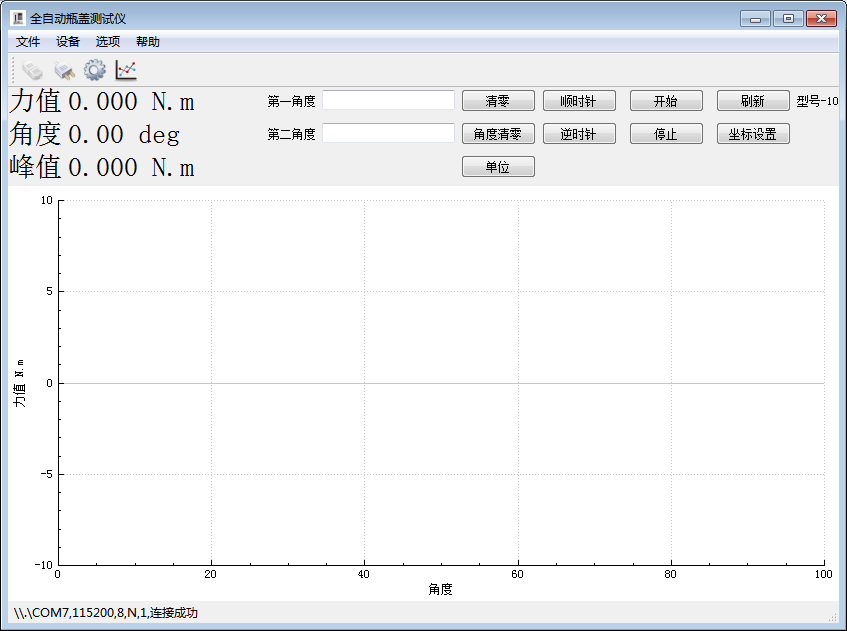
a. Click \"File \" at the top left of the software, there will be five options: \"New, Open, Save, Export, Exit \". The first four items are used to view the saved test data, and exit is to close the software.
b. Click \"Device \" at the top left of the software, two options will appear: \"Connect, Disconnect \", used for product software connection operation
c. Click \"Options \" at the top left of the software, there will be three options: \"Settings, machine parameters, language \",
\"Settings \" is used to select the serial port and modify various connection parameters.
\"Machine parameters \" can modify the machine parameters directly on the software.
\"Language \" is used to modify the software display language category. (Choose between Chinese and English)
d. Click \"Help \" at the top left of the software, a selection will appear: \"About \", this selection indicates the version number of the software.
5.1The first angle and the second angle are the torque angle mode included in the software, which is mainly used to record the real-time curve of rotation. Two angle values need to be set. After starting, the current angle value will be reset to zero, and the two angle values will be reached in sequence. Then return to the origin and record the three-segment curve to display on the computer software.
5.2Zero clear, angle zero clear, unit, clockwise, counterclockwise, stop, have been introduced before, please see the parameter description above for details.
Start: Used to start the test after the software connection is completed.
Refresh: Used to refresh the loading software interface. Refresh processing can be performed when the software card is stuck.
Coordinate setting: used to modify the coordinate display of the software, and adjust the upper and lower limits of the X and Y axes according to requirements.
Fourth, daily maintenance and maintenance
1. The environment should be kept clean to prevent liquids, iron filings, etc. from intruding into the instrument and damaging electronic components.
2. Please clean the instrument with a soft cloth, immerse the cloth in the water soaked with detergent, wring it out and remove the dust and dirt.
Note: Do not use volatile chemicals to clean the instrument (such as volatile agent, thinner, alcohol, etc.).
3. Do not operate the machine in the following environment
a. Humid environment
b. Dusty environment
c. Where oil or chemicals are used
d. Places with earthquake sources around
4. When not in use for a long time, you should unplug the power plug and deal with dust and moisture.
V. Random accessories
|
Serial number |
Accessories name |
specification |
Usage / unit |
|
1 |
instrument |
ANPM |
1 set |
|
2 |
power cable |
- |
1 |
|
3 |
Instructions |
- |
1 serving |
|
4 |
Certificate of conformity |
- |
1 serving |
|
5 |
Warranty Card |
- |
1 serving |
|
6 |
Data disc |
- |
1 |
|
7 |
Communication data line |
RS-232 to USB |
1 |
|
8 |
Allen wrench |
5mm |
1 |
|
9 |
Allen wrench |
8mm |
1 |
|
10 |
Thermal paper |
57 * 30mm |
1 roll |