
1,Overview
1.Main purpose and scope of application
ANS digital torque screwdriver is a product designed for assembly and torque testing of small torque fasteners in the precision manufacturing industry An essential tool for precise torque connection. Compared with mechanical preset screwdrivers, torque control is more accurate.
2.Features
1The torque-angle value can be read directly.
2Automatic shutdown after 5 minutes of inactivity, saving power.
3Operate clockwise and counterclockwise.
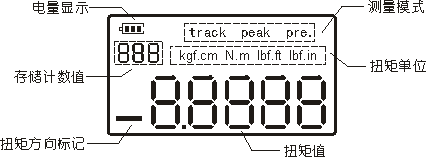
4The three working modes of real-time, peak and preset values can be switched freely.
5Choice of four torque units (N.m, lbf.ft, lbf.in, kgf.cm).
6In peak modeData storage function.
7Torque direction mark and battery level display.
3.Specification model
|
model |
Range (N.m) |
Index value (N.m) |
Accuracy |
Nominal size of inner six parties |
net weight |
|
|
inch |
mm |
(kg) |
||||
|
ANS-0.5 |
0.05-0.5 |
0.0001 |
± 2% |
1/4 |
6.35 |
0.4 |
|
ANS-2 |
0.2-2 |
0.001 |
1/4 |
6.35 |
||
|
ANS-4 |
0.4-4 |
0.001 |
1/4 |
6.35 |
||
|
ANS-8 |
0.8-8 |
0.001 |
1/4 |
6.35 |
||
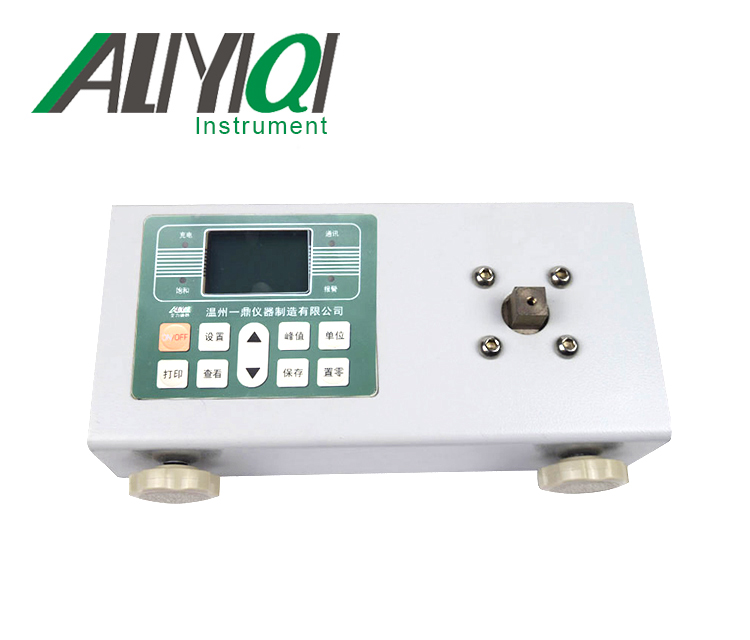
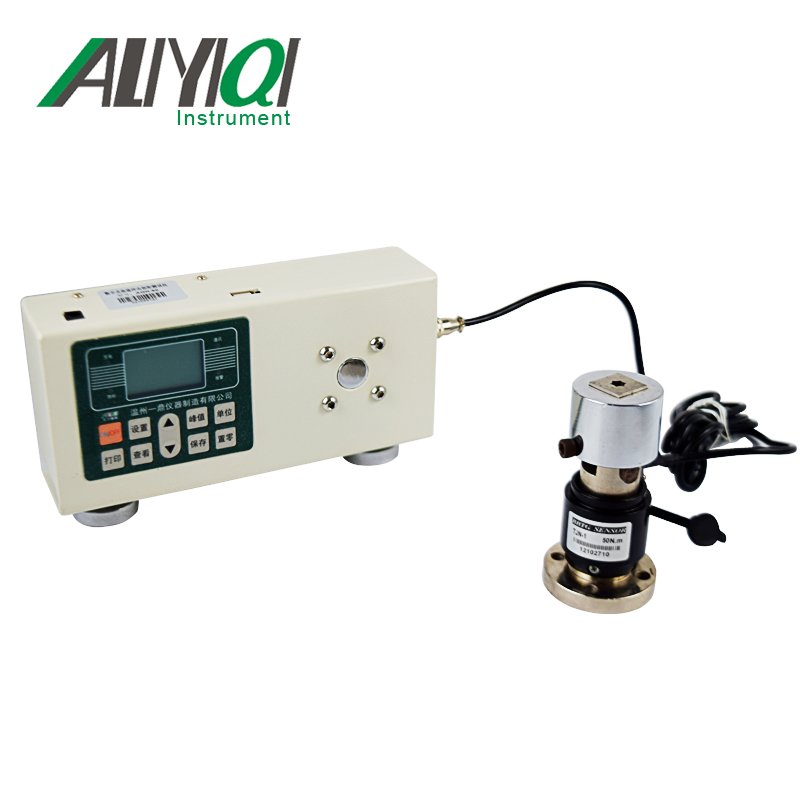
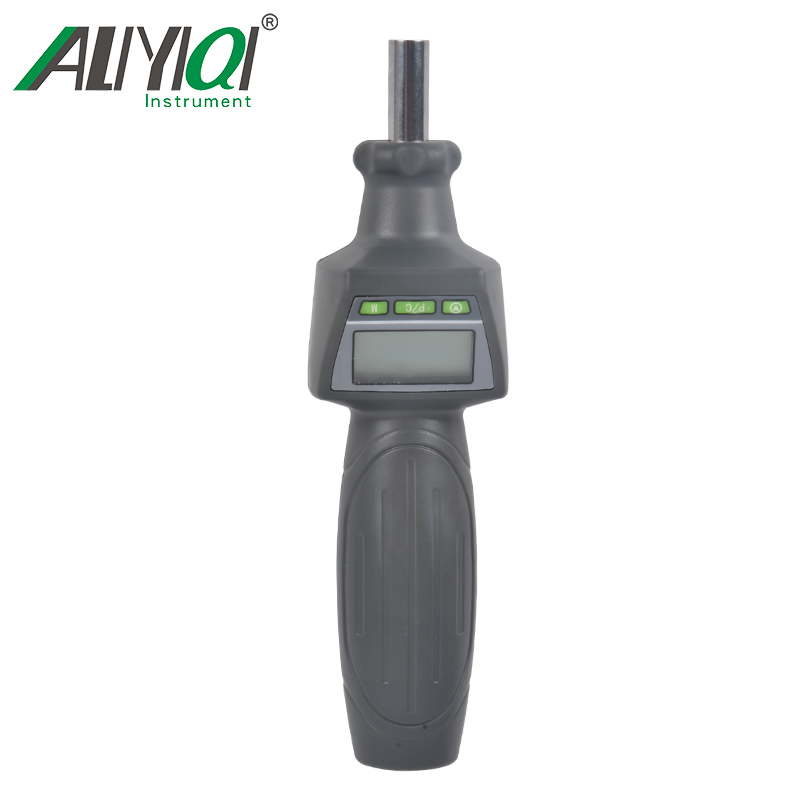
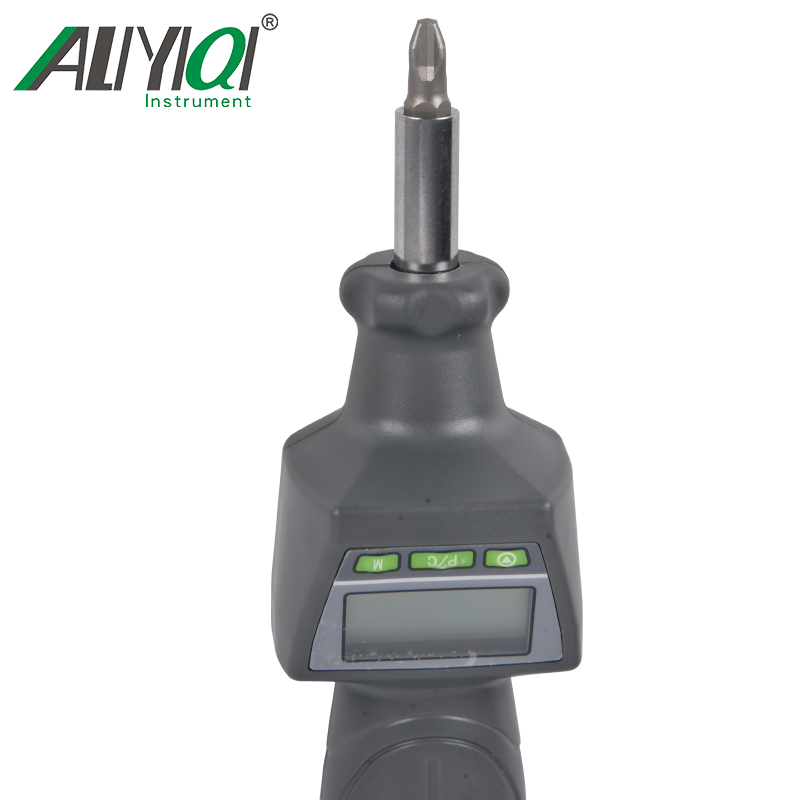
2,product structure
2.1 Outline drawing
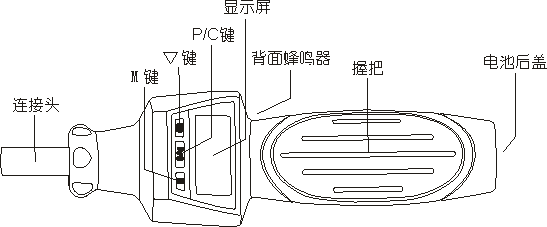
2.2 Schematic diagram of LCD screen
3. Technical Parameters
3.1 Accuracy: 2% in both directions.
3.2 The pre-alarm range is 90% of the preset torque value.
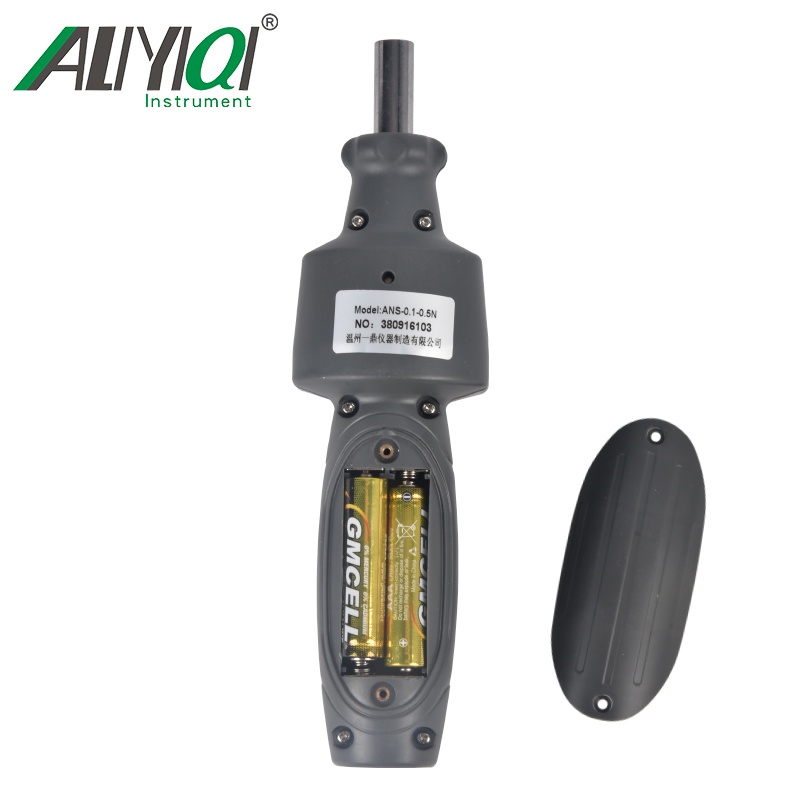
3.3 Power supply: 2 AAA batteries.
3.4 Operating environment: temperature (0 ~ 40) ℃, humidity ≤85%.
3.5 Storage environment: (-10 ~ 60) ℃.
4. Instructions
4.1 Operating instructions
① Turn on / off
Turn on: Press \"P / C \" to turn on the machine. Shutdown: Press \"P / C \" to shut down the machine. If the power is insufficient, it will automatically shut down; if the machine does not work for 5 minutes, it will automatically shut down.
② Working mode setting
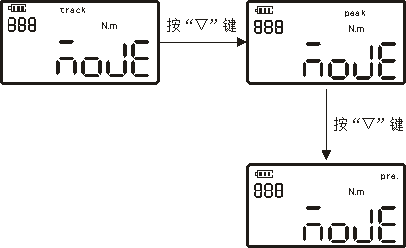
Long press \"M \" key to enter the menu interface, short press \"M \" key to switch to MODE option, short press \"▽ \" key to select working mode. \"track \" is the real-time mode, \"Pre. \" is the preset mode, \"peak \" is the peak mode.
a.Real-time mode
In real-time mode, the LCD screen displays the word track to achieve real-time tracking of torque values. In real-time mode, the LCD screen displays the loading torque value in real time.
b.Preset mode
Under the working interface of torque driver, short press \"▽ \" key to display the preset value, press \"▽ \" key again to set the preset value, when the preset value is adjusted to the required value, press \"M \" Press Save to exit. When locking in preset mode, when the tightening torque reaches 80% of the preset value, the buzzer and indicator will flash alarm at intervals, the closer to the preset value, the higher the buzzer and indicator flashing alarm frequency, the higher When setting the value, the buzzer sounds long and the indicator light is always on. In the preset value mode, the force value will be saved in the peak state. When you need to save the data, you can press the \"M \" key to save the data. When the force value is zero, the data cannot be saved.
Tip: When the buzzer function is turned on, the buzzer will respond.
c,Peak mode
In peak mode, the LCD screen displays the peak value of the loading torque. When you need to save the peak data, you can short press \"M \" to save the current peak data, and you can short press \"P / C \" to clear the current peak data.
③ Torque unit switching
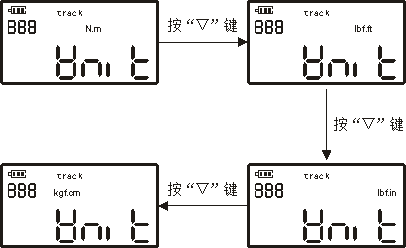
Long press \"M \" key to enter the setting menu, short press \"M \" key to switch to UNIT option, short press \"▽ \" key to freely select 4 torque units, short press \"M \" key Save the selected torque unit and exit the menu.
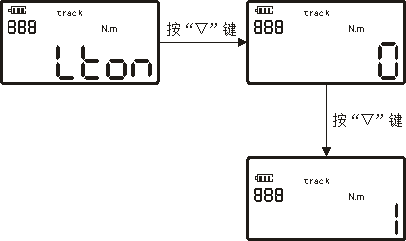
④ LCD backlight function
Long press \"M \" key to enter the setting menu, short press \"M \" key to switch to LTON option, short press \"▽ \" key to choose to turn on or off the backlight. The number 1 indicates that the backlight is on, and the number 0 indicates that the backlight is off.
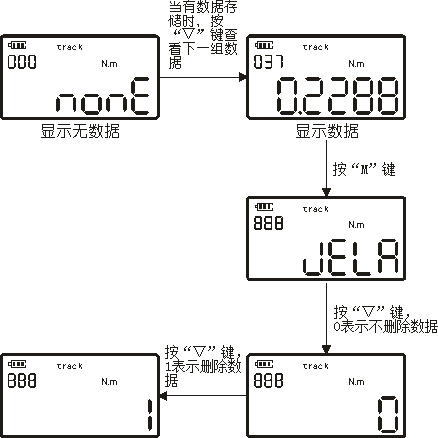
⑤ Data storage, viewing and deleting
In peak mode, this product manually stores force value data, short press \"M \" key to save current torque peak value. Long press \"M \" to enter the setting menu, short press \"M \" to find the data group, and short press \"▽ \" to view all the data. Short press \"M \" key to switch to JELA option, short press \"▽ \" key to delete all stored data. The number 1 means to delete the data, the number 0 means not to delete the data, short press \"M \" key to exit the setting menu.
⑥ Buzzer setting
Long press \"M \" key to enter the setting menu, short press \"M \" key to switch to BUZZ option, short press \"▽ \" key to choose to turn on or off the buzzer. Number 1 means open, number 0 means close, short press \"M \" key to exit setting menu.
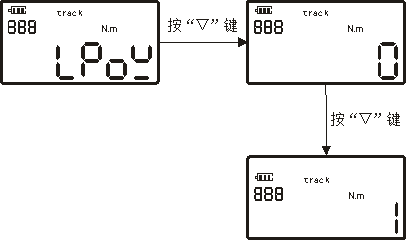
⑦ Low power consumption setting
Low power consumption can reduce the consumption of battery power and improve the use time of torque screwdrivers. Long press \"M \" key to enter the setting menu, short press \"M \" key to switch to LPOW option, short press \"▽ \" key to select on or off. Number 1 means open, number 0 means close, short press \"M \" key to exit setting menu.
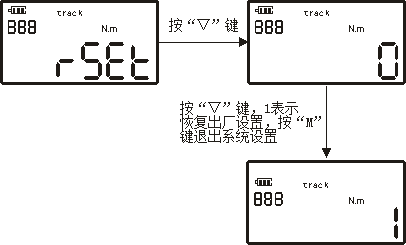
⑧ Restore factory settings
When the user data setting is confusing, you can use restore factory settings, all parameters of the torque driver will be restored to the factory settings. Long press \"M \" key to enter the setting menu, short press \"M \" key to switch to RSET option, short press \"▽ \" key to select whether to restore the factory settings. Number 1 means open, number 0 means close, short press \"M \" key to exit setting menu.
Note: Put two AAA batteries into the battery box, please pay attention to the positive and negative directions.
4.2 Schematic diagram of parameter setting
① Setting menu
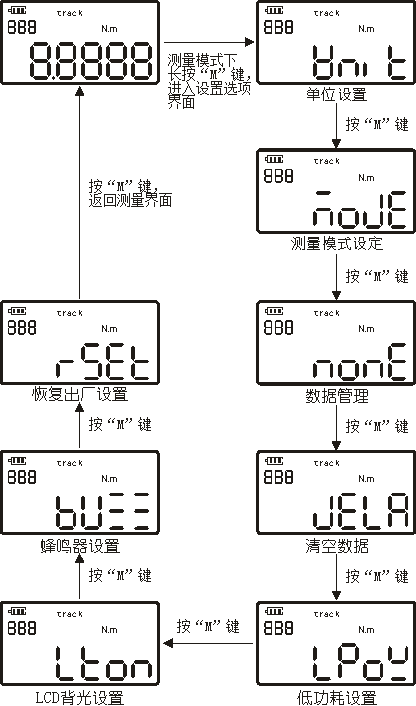
② Schematic diagram of unit setting
③ Schematic diagram of working mode setting
④ Schematic diagram of viewing and deleting data
⑤ Schematic diagram of low power consumption setting
⑥ LCD backlight setting diagram
8Schematic diagram of buzzer setting

⑧ Schematic diagram of restoring factory settings
5. Repair and maintenance
In order to ensure the accuracy of the product, the product should be regularly verified to ensure its normal use.
1Verification requirements:
According to the frequency of use of the product, determine the verification cycle.
2Verification period:
The verification period is generally 12 months, and the verification period for frequently used products is 6 months. Bolts and nuts fastened in important positions should be verified before each use to ensure their accuracy.
3Qualification:
The verification personnel are manufacturers or professionally qualified measurement personnel, and the verification equipment is a verification instrument with a system error of less than or equal to 0.3%.
4Don't use it as a hammer during use, try to avoid knocking and falling.
5It is strictly forbidden to use 20% overload, so as not to damage the sensor of the product.
6It is strictly forbidden to disassemble the product at will. If you encounter any problems, please contact our company in time.
7After using the product, it should be placed in the box.
1,Random attachment
|
1 |
Digital torque driver |
1 |
|
2 |
Instructions |
1 serving |
|
3 |
Certificate of conformity |
1 serving |
|
4 |
Desiccant |
1 package |
|
5 |
7 # battery |
2 knots |
|
6 |
Warranty Card |
1 piece |