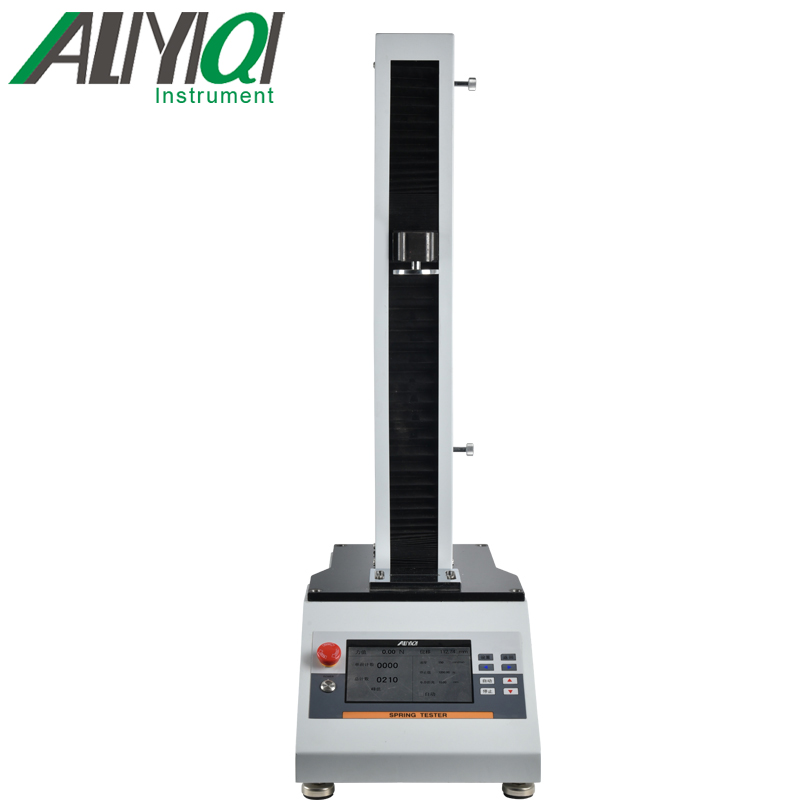
AEL-A integrated testing machine
I. Overview
1.1Main purpose and scope of application
AEL-AThe integrated testing machine is an integrated testing machine dedicated to testing tension or compression. Replace traditional electric (manual) test machine+The test method of digital display table enhances the accuracy of test and the convenience of operation. It is suitable for the testing of push-pull load, insertion force, destruction test of rubber and plastic, light industrial textile, building doors and windows, composite materials, wire and cable, auto parts, power machinery, scientific research institutions and other industries.
1.2Features
1.2.17Inch large screen LCD display;
1.2.2Real-time force value and displacement display;
1.2.3Two measurement modes: real-time/Peak
1.2.4Two working modes: automatic/Manual
1.2.5Man-machine Chinese dialogue is intuitive and clear;
1.2.6There is a continuous increase/Speed reduction function;
1.2.7With emergency stop function.
Second, product model specifications
|
Type number |
AEL-A-2 |
AEL-A-3 |
AEL-A-5 |
AEL-A-10 |
AEL-A-20 |
AEL-A-30 |
AEL-A-50 |
AEL-A-100 |
AEL-A-200 |
AEL-A-300 |
AEL-A-500 |
AEL-A-1000 |
|
|
MAX negative Charge |
2N |
3N |
5N |
10N |
20N |
30N |
50N |
100N |
200N |
300N |
500N |
1000N |
|
|
0.2kg |
0.3kg |
0.5kg |
1kg |
2kg |
3kg |
5kg |
10kg |
20kg |
30kg |
50kg |
100kg |
||
|
0.45Lb |
0.65Lb |
1.1Lb |
2.2Lb |
4.5Lb |
6.5Lb |
11Lb |
22Lb |
45Lb |
65Lb |
110Lb |
220Lb |
||
|
Load points Degree |
0.001N |
0.01N |
0.1N |
||||||||||
|
0.0001kg |
0.001kg |
0.01kg |
|||||||||||
|
0.0001Lb |
0.001Lb |
0.01Lb |
|||||||||||
|
Accuracy |
±0.5% |
±1% |
|||||||||||
|
Effective itinerary |
400mm |
||||||||||||
|
Test speed |
1-300mm / min |
||||||||||||
|
Operating Voltage |
AC: 110V or AC: 220V |
||||||||||||
|
Dimensions |
290mm * 500mm * 900mm |
||||||||||||
|
net weight |
37kg |
||||||||||||
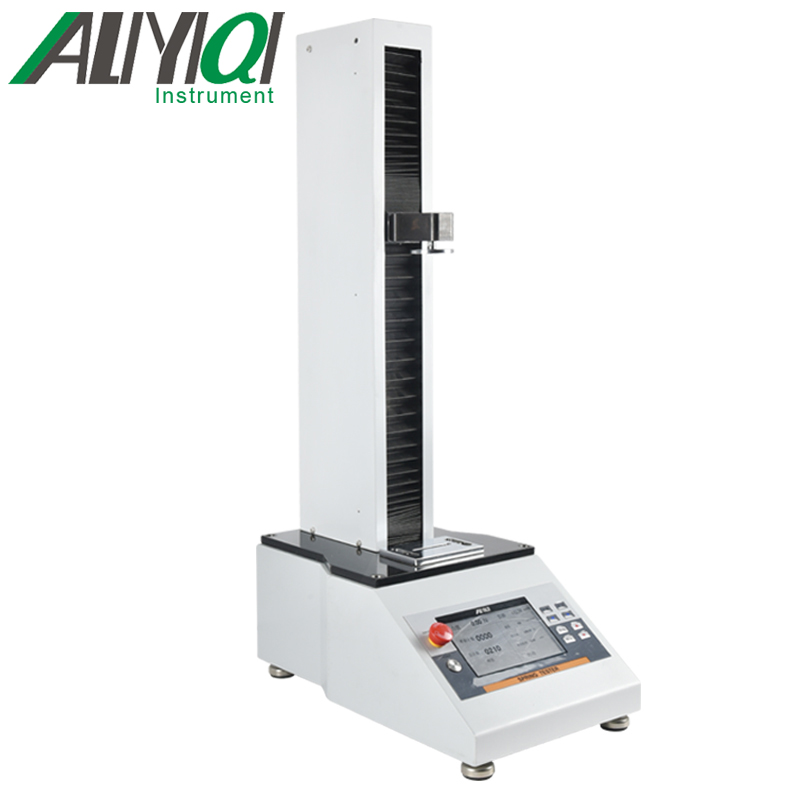
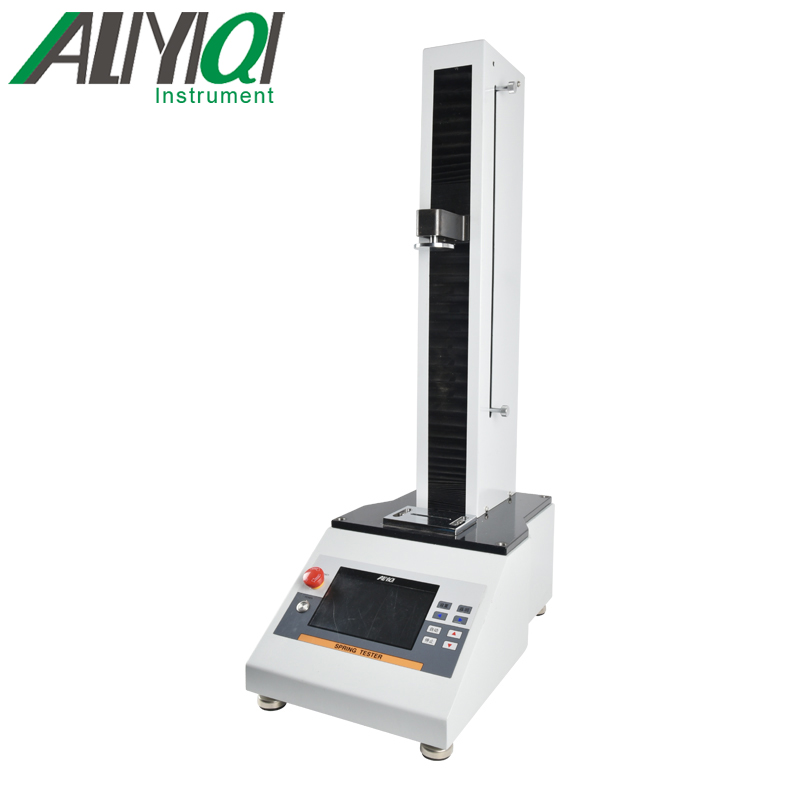
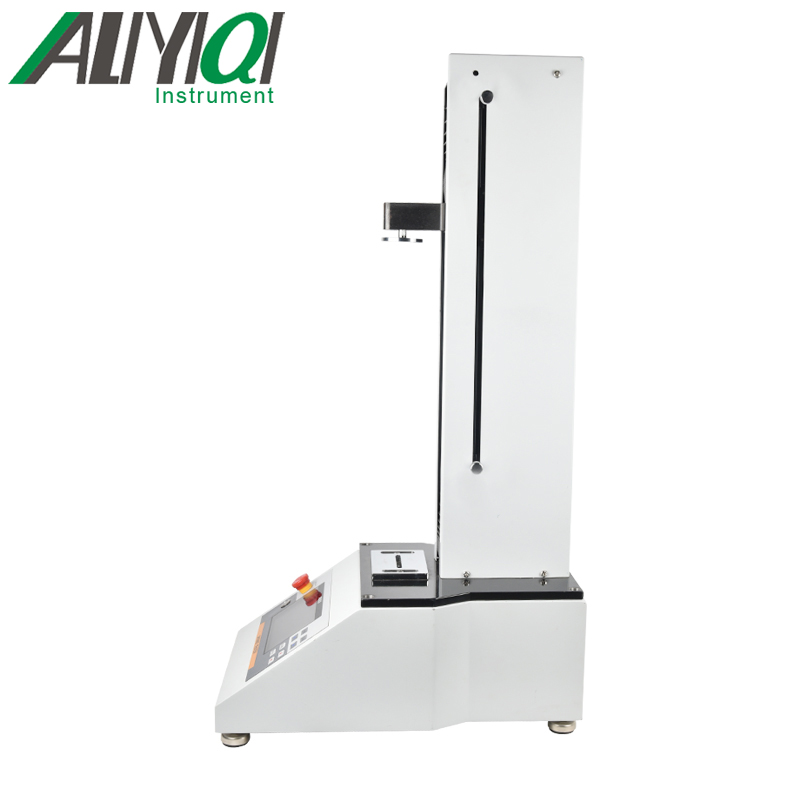
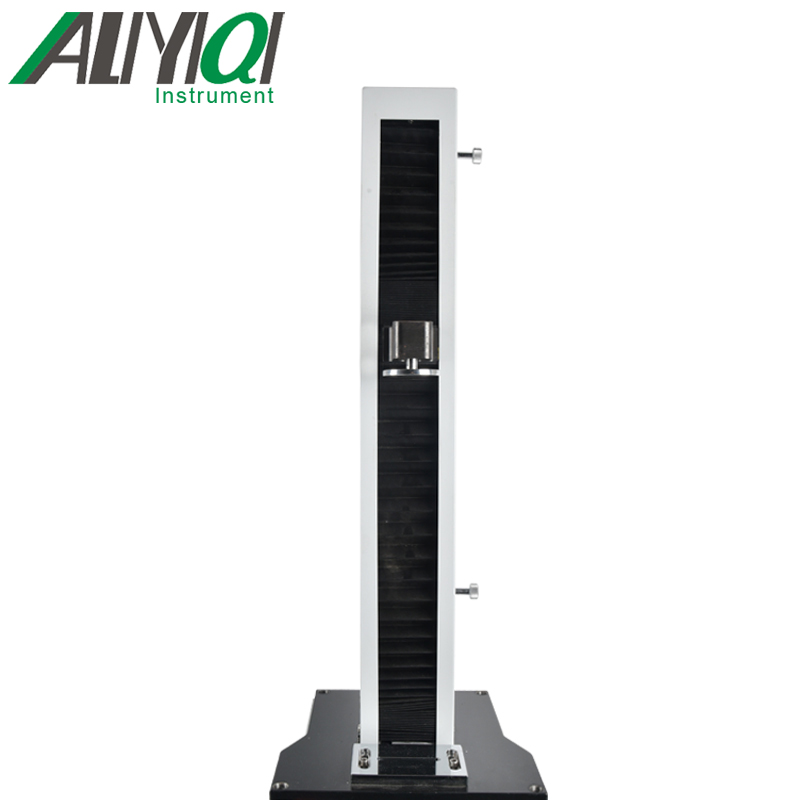
3. Overall product structure
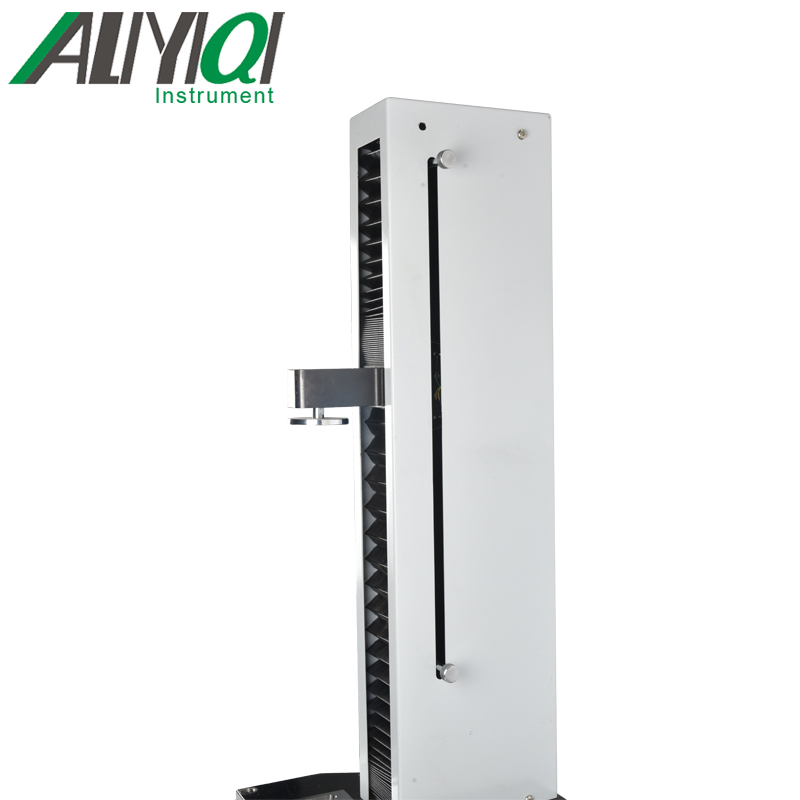
3.1Appearance structure
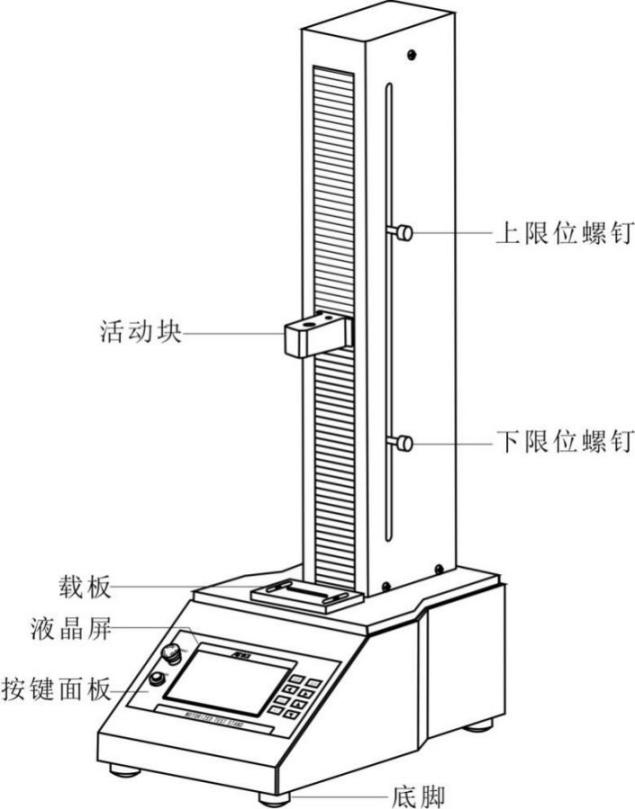
3.2Key Description
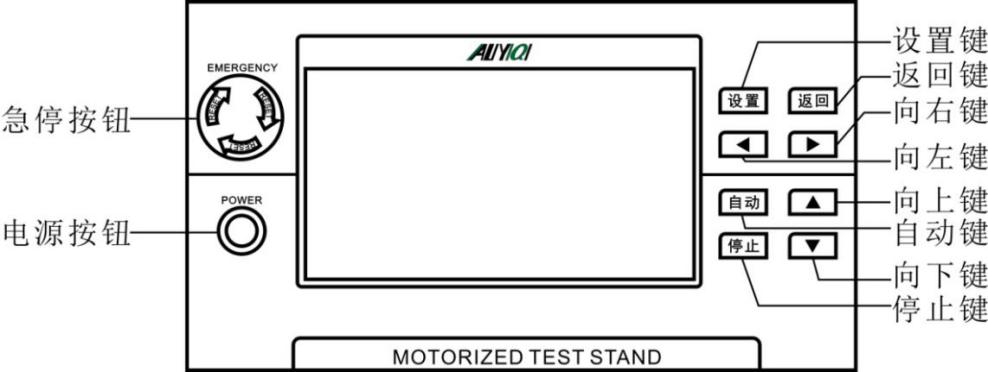
3.2.1Emergency stop button: When an emergency occurs, the user can press the emergency stop button to cut off the power and stop the instrument; if you want to restart, you need to rotate the emergency stop button to the right and then press the power button to start.
3.2.2Power button: on/Shut down button. When the power is on, press this button to turn on the instrument; press it again to turn off the instrument.
3.2.3Setting key: long press this key in the measurement interface4Release in seconds to enter the system setting interface; short press to switch real-time/Peak mode.
3.2.4Back key: clear/return. Press this key in the measurement interface to reset the force value; long press this key4Release it in seconds to reset the current displacement to zero; press this key in the setting interface to return to exit.
3.2.5 ◀(left)Key: Deceleration. Short press this key, the measurement interface\"Speed \" will decrease1mm; Long press this key4After releasing in seconds, the\"speed\" of the measurement interface will decrease continuously; in the system setting interface, press this key to select the number of digits.
3.2.6 ▶(To the right)Key: acceleration. Short press this key, the measurement interface\"Speed \" will increase1mm; Long press this key4After releasing in seconds, \"speed \" on the measurement interface will increase continuously; in the system setting interface, press this key to select the number of digits.
3.2.7Auto key: Auto run key. Press this key once to start the automatic operation mode and the automatic box will be ticked.
3.2.8Stop button:Long press this key4Release in secondsget onN、Kgf、LbfThree units can be switched at will;In automatic mode, press this key once, the active block will stop running; in the system setting interface, it can be used to switch the setting items。
3.2.9▲(up)Key: Run up. Click this button, the active block will move up one\"Single step distance \"; long press this key4After releasing in seconds, the active block will run upwards until it hits the upper limit screw; in the system setting interface, this key can be used to set the value.
3.2.10▼(down)Key: Run down. Click this button, the active block will move down one\"Single step distance \"; long press this key4After releasing in seconds, the active block will run down until it touches the lower limit screw; in the system setting interface, this key can be used to set the value.
Four, use and operation
4.1Operation and instructions in use
4.1.1 Boot display


Model specifications Measurement interface
4.1.2Measurement interface
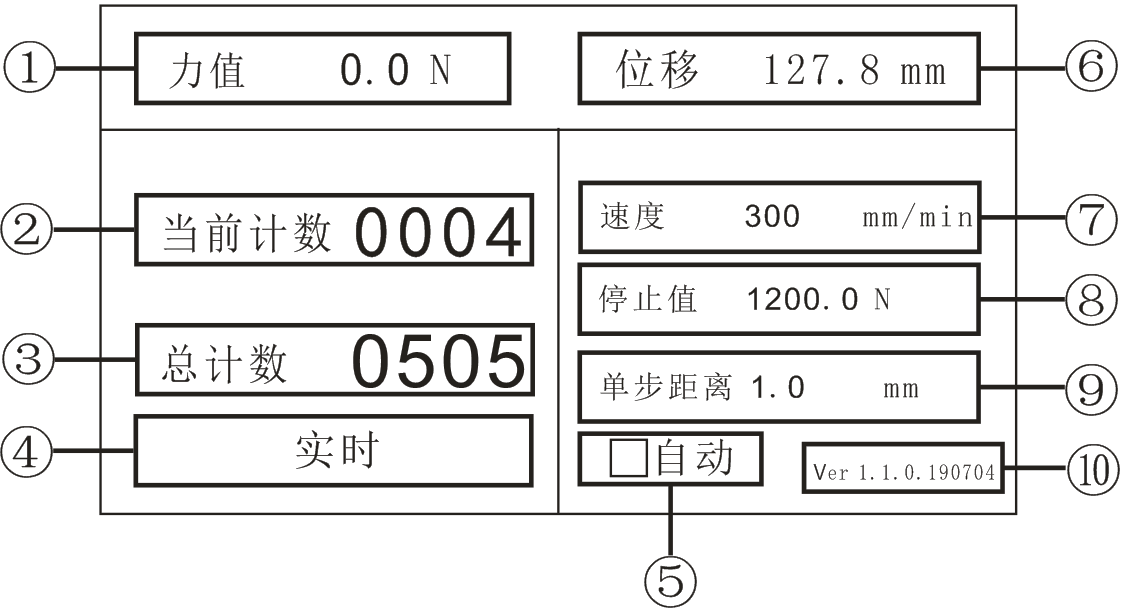
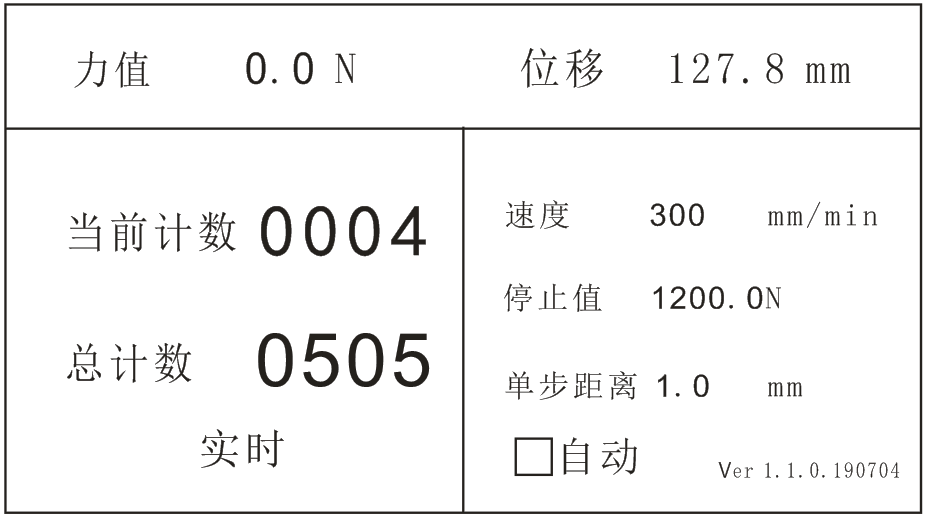
①Measured force value display. ② Record the number of round-trip running of the real-time test.
③ Preset the total number of automatic tests. ④Measurement mode: Press \"Settings \" to switch between real-time peak values.
⑤automatic/Manual mode. ⑥ Displacement value display.
⑦ Preset speed value. ⑧Preset stop value.
⑨In manual modeclick it once\"▲\"or\"▼\"Key activity block will move up or downDistance value.
⑩version number.
4.1.3 Set interface
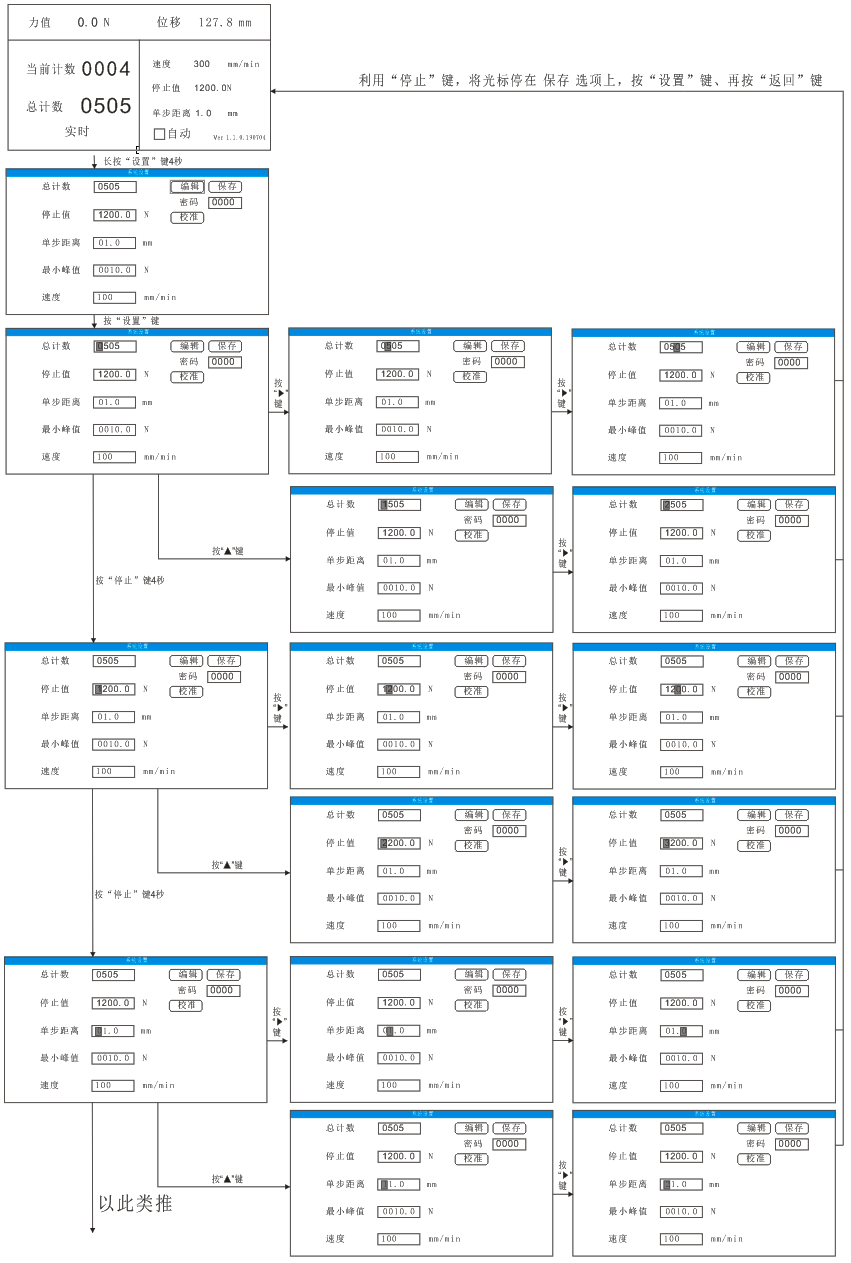
Press and hold in the measurement interface\"Settings \" key4After seconds, enter \"System Settings \",Click again\"Settings \" key to edit value setting,As shown below:
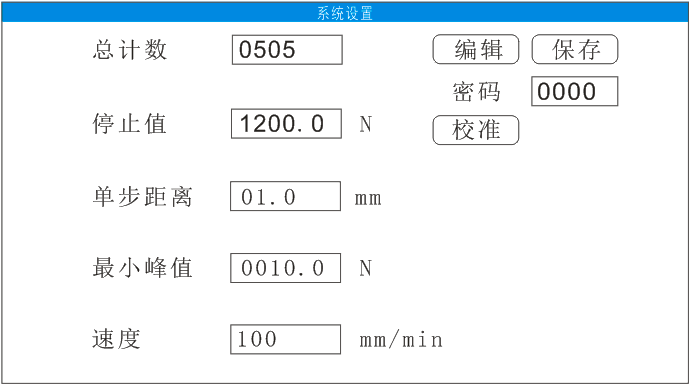
a, Total count: preset value,systemThe default value is1,Can be set1 ~ 9999In the range. For example: the user performs continuous testing on a product, and the number of tests is set to505Press the\"\" Auto\"\" button in the measurement interface to proceed505Test; instrument running505Automatically stop after the second time, the total count is only for the automatic mode; after the user setting is completed,按\"Stop \" key to switch to \"Save \" option, then click \"Setting \" key to save the setting value, press \"Back \" key to exit the system setting.
b.Stop value: For automatic mode, MAX can be set to full scale120%, The system default value is full scale. For example: set the stop value to \"1200\"N, When the detection force value reaches1200NThe instrument will automatically stop running at the time; after the user setting is completed, press \"Stop \" key to switch to \"Save \" option, then press \"Setting \" key to save the setting value, press \"Back \" key You can exit the system settings. If the detection force value reaches the stop value in the automatic mode, the instrument will stop running and exit the automatic mode.
c.Single step distance: In manual mode, press \"up \" or \"down \" key, the active block will move up or down by one\"\" single step distance\", the system default value is1, Single step distance can be set0.1-10mm. After the user setting is completed, press \"Stop \" key to switch to \"Save \" option, then press \"Setting \" key to save the setting value, press \"Back \" key to exit the system setting.
d.MIN peak value: the user sets to detect the MIN peak value, the system default value is full scale1%, The range can be set0-full range. After the user setting is completed, press \"Stop \" key to switch to \"Save \" option, then press \"Setting \" key to save the setting value, press \"Back \" key to exit the system setting.
e.Speed: The user can set the up and down movement speed value of the active block, and the system default value is100,Scope can be set1-300mm / min. After the user setting is completed, press \"Stop \" key to switch to \"Save \" option, then press \"Setting \" key to save the setting value, press \"Back \" key to exit the system setting.
f.Calibration: Sensor calibration. The specific operation method is as follows:
f-1.After the instrument is turned on, long press the\"Settings\" key on the measurement interface to enter the setting interface;
f-2.Press \"Stop \"2Times, press \"up▲\",\"left▶\"、\"on▲\",\"left▶\",\"on▲\"、\"左▶\",\"on▲\";
f-3.Press \"Stop \" key, then press \"Setting key \";
f-4.Press \"▼ or▲键\"Select the corresponding segment;
f-5.按\"Stop \" key, then press \"Settings \" key, hang full range weight;
f-6.按\"Stop \" key, then press \"Settings \" key;
f-7.按\"return key2Times.
Remarks:Password: user calibration password, the password is\"1111\", After entering the correct password, select \" calibration \"option to calibrate the sensor。
4.2Steps
4.2.1Automatic modeHow to use:
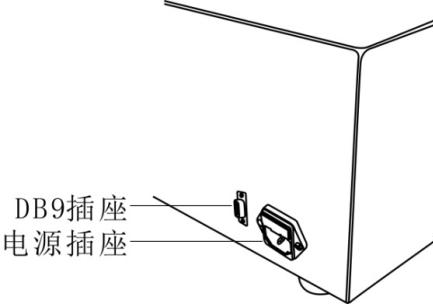
⑴2. Make sure the power cord is connected;
⑵, confirm whether the emergency stop button is in the released state;
⑶、 Turn on the power button;
⑷,Press\"Settings \" key enters the system setting interface in 4 seconds,在\"Total count\"Options,Press first\"▶\"(To the right)键Move the cursor and press again\"▲\"(up)键Adjust it to the desired number; then press\"Stop \" key jump selection \"Stop value\"Options, continue按\"▶\"(To the right)键Move the cursor and press again\"▲\"(up)键Adjust it to the required number;
⑸、按\"Setting \" key to save the setting data, then press \"Back \"To measurement interface;
⑹、按\"Settings \" key to switch to selectMeasurement mode (real-time or peak);
⑺、Load the object to be measured and adjust the position of the upper and lower limit screws;
⑻, debugging0 o'clock position, and按\"Back \" key to reset force value, long press \"Back \" key to reset displacement;
⑼, press \"Auto \" to tick the box on the screen.
⑽ 、 Adjust the appropriate speed as needed:dog\"◀\"(left)键,speed值减1,Press\"◀\"(left)键,speed值Continuous reduction小,until1For the mostdog\"▶\"(To the right)键,speedValue plus1,Press\"▶\"(To the right)键,speed值continuousIncrease until300For the most
⑾ 、 backPress\"▲ \" or \"▼ \" key to start measurementtest.
4.2.2ManualDynamic modeHow to use:
⑴、Make sure the power cord is connected;
⑵, confirm whether the emergency stop button is in the released state;
⑶、 Turn on the power button;
⑷,Press\"Settings \" key4Enter the system setting interface in seconds,按\"Stop \" key jump selection \"Single step distance\"Option, I take the single step distance as1 as an example, first press \"▶\"(To the right)键Move the cursor and press again\"▲\"(up)键Adjust it to the required number;
⑸、按\"Setting \" key to save the setting data, then press the back key to returnTo measurement interface;
⑹、按\"Settings \" key switchselectRequiredMeasurement mode (real-time or peak);
⑺、Load the test object, press\"Back \" key to reset force value, long press \"Back \" key to reset displacement;
⑻ 、按\"Auto \" key removes the tick from the box on the display;
⑼, adjust the appropriate speed according to needs:dog\"◀\"(left)键,speed值减1,Press\"◀\"(left)键,speed值Continuous reduction小,until1For the mostdog\"▶\"(To the right)键,speedValue plus1,Press\"▶\"(To the right)键,speed值continuousIncrease until300For the most
⑽ 、 According to the need, carry out 0 point approval;
⑾,按\"▲ \" or \"▼ \" key to start the test.
V. Daily maintenance and maintenance
5.1 The environment should be kept clean to prevent liquids, iron filings, etc. from intruding into the instrument and damaging electronic components.
5.2 Please clean the instrument with a soft cloth, immerse the cloth in the water soaked with detergent, wring it out and remove the dust and dirt.
Note: Do not use volatile chemicals to clean the instrument (such as volatile agent, thinner, alcohol, etc.).
5.3 Do not operate the machine in the following environment
a. Humid environment
b. Dusty environment
c. Where oil or chemicals are used
d. Places with earthquake sources around
5.4 When not in use for a long time, the power plug should be unplugged to prevent dust and moisture.
6. Random accessories
|
1 |
Machine |
1 set |
|
2 |
Power cord (European/Chinese one) |
1 Article |
|
3 |
Instructions |
1 serving |
|
4 |
Inspection certificate |
1 serving |
|
5 |
Certificate of conformity及Warranty Card |
1 piece |
|
6 |
Desiccant |
1 package |
|
7 |
Carrier board |
1 piece |
|
8 |
AJJ-023 fixture |
2个 |
|
9 |
Hex nut M6 |
2 pcs |
|
10 |
Double-head screw M6 * 45 |
2 pcs |
|
11 |
内HexagonScrewsM4 * 10 |
4 pcs |
|
12 |
内HexagonScrewsM6 * 16 |
4 pcs |
|
13 |
外HexagonScrewsM6 * 25 |
1 piece |
|
14 |
内HexagonScrewsM12 * 30 |
1 piece |
|
15 |
内Hex wrench M4. M6, M12 |
各1把 |
|
16 |
Computer cable (USB to serial cable) |
1 Article |
|
17 |
CD |
1 serving |